Webassembly Synthesizer
Introduction
This post details my works and achievements in creating a Webassembly-based sound synthesizer with a keyboard and sequencer, which in theory can run on any device with a browser that supports Webassembly and (experimental as of May 2020) AudioWorklet. This write-up is based on the work I did for the 1st semester during my MSc studies. The full code for this project is available on my GitHub, in this repository.
Motivation
I have always had great passion for music, be it listening or making, but after years of playing the violin and guitar, I decided to venture more into the world of creating electronic music. However, music software and hardware is really expensive, for example the Teenage Engineering OP-1, which is a great portable synthesizer and all-in-one instrument costs €1399. This is when I realized, that being a software engineer can help me in this matter, as I can create a custom solution fitting my needs perfectly.
Starting out, I decided not to create a hardware-based gadget, as development and debugging is much slower than on a dedicated PC. However, I also a wanted the project to be easily portable, available anywhere on most devices - this is when it dawned on me that Webassembly (which I have been interested in for a while) is the perfect solution for this, if I can manage to make it work.
Layout
Below are my findings and experience gathered during this semester’s work. After detailing the used technologies, an explanation and demonstration can be found for each feature implemented in the project. Finally, a short summary with some future plans can be located at the end.
Technologies
Webassembly
As mentioned before, my idea for real-time sound synthesis was to utilize Webassembly (or WASM for short) to achieve better performance, especially on mobile devices, where running extensive JavaScript content is difficult. Webassembly is a special type of machine language that can run inside the browser. It’s main advantage is that unlike JavaScript, Webassembly code is much faster and smaller, as the browser engine processes binary instructions instead of interpreting source code, much like a real CPU. This makes Webassembly perfect for performance-heavy tasks, like running complex algorithms, graphics, or in this case, sound manipulation.
Rust
As with traditional Assembly, developers rarely write code directly in WASM - instead, they use a compiler to generate code from a higher-level language. At first, the concept for Webassembly was to transfer already written C/C++ code to the web, resulting in the emscripten compiler and toolchain, which could create WASM using a modified version of the clang compiler.
However, in the past few years, a new contender arrived on the horizon of non-garbage-collected languages, called Rust. Rust aims to provide developers a language that is as powerful as C++, with added safety and security to avoid issues arising from unchecked memory manipulation, which is a recurring theme during C++ debug sessions. Moreover, the language aims to provide all this at compile-time, meaning that our code can run optimally and be correct at the same time. Of course, this requires developers to have a slightly different mindset, but with helpful compiler warnings and errors and with extensive documentation available, this transition is not that painful.
wasm-bindgen
Of course, Rust being a general programming language, only provides a “traditional” compiler out-of-the-box, which can generate x86/ARM code. For WASM, a 3rd-party compiler called wasm-bindgen can be used, which provides compilation to WASM and two-way interaction with JavaScript.
The #1 feature of wasm-bindgen however, is its ability to create JavaScript and TypeScript bindings for the compiled Rust code, making function calls and object management really easy and streamlined. This process is as follows:
- Create the project using the tutorial found on the
wasm-bindgenwebsite - Implement performance critical algorithms/procedures in Rust
- If required, import JS functionality, e.g.
console.logfor debugging and logging - Annotate the required types and functions with
#[wasm_bindgen], as the compiler will only create bindings for these - Compile with
wasm-pack build, which outputs the.wasmbinary with the generated bindings - Import the newly created functionality into the
.jsfile, using the ES import syntax - Use types and call functions in JavaScript, just like with any other type!
AudioWorklet
Audio processing is a notorious example of a real-time process, as it is heavily based on timing and frequencies. This is why such programs often use a dedicated sound processing thread, where the sound card can request fixed-size sample blocks to be played at the right time. Achieving this correctly in a browser is (was?) difficult, as JavaScript runs on a single thread, apart from Web Workers, that can provide some form of concurrency.
However, a new approach called AudioWorklet possesses the tools and functionality that is required for such low-level audio processing and synthesis tasks. An AudioWorklet can be regarded as a digital signal processor, that outputs its processed input signals. What is more, this processing is done in an entirely different scope, called AudioWorkletGlobalScope, which is basically a background thread exclusive to audio-related tasks, only providing audio-related functionality. Here, the Web Audio API will call the worklet’s process(input, output, params) method when a new sample block is needed. Creating one can be achieved with the steps below:
- Create a JavaScript file with a class that extends
AudioWorkletProcessorin it - Define the process method, which writes 128 samples (a 128-long
number[]) into theoutputparameter (there can be more than one output, this requires special handling) - Return
truefrom the method, or returnfalseif the processor’s operation is finished - Register the processor in the same file using the
registerProcessor(name, className)function - In the main JavaScript source, set up
AudioContextand load the processor by file name using theAudioContext.worklet.addModule(filename)method (these are async!) - Instantiate the processor by creating an
AudioWorkletNode(context, processorName)and wire it up to the output, which passes the samples to the sound card (workletNode.connect(context.destination)) - If a more complex audio system is desired, wire it up using multiple
connect(next)methods in the desired order
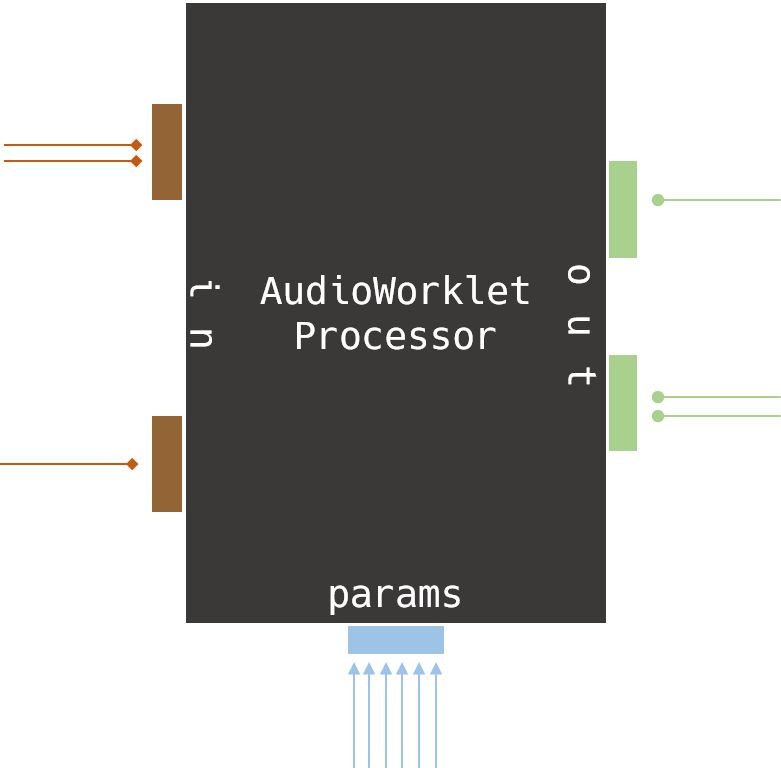
As the worklet is essentially located in a separate thread, communication requires a bit more effort than just calling methods on the object. Instead, every worklet comes with a messagePort, which is a bidirectional communication channel between the main thread and the worker, but it is mostly utilized when forwarding user events to the worklet. Using worklet.port.postMessage(object), an arbitrary JS object can be passed along to the processor, which receives messages using its port.onmessage callback function. Message data is located inside the data property of the received object.
Webpack
Webpack handles the bundling and packaging of the project, as it can be easily customized using its plugin system, from which 2 are required:
IgnorePlugin: Webpack must not bundle files containingAudioWorklets, as they are separate entities from the main project, not requiring bundling and import resolvingCopyWebpackPlugin: instead, these files need to be copied into the output package intact; compiled WASM files and bindings are also copied this way because they are used insideAudioWorklet(otherwise they could be bundled)
AudioWorklet, WASM with Webpack
The combination of the above techniques did not go without hassle, as combining already experimental solutions usually results in an even more fragile project. However, after some tinkering, I found a way to make it all work.
The first important step was to realize that the processor and WASM files must not be bundled with the main project, as they are loaded dynamically at runtime. Unfortunately, this results in another caveat: Webassembly can only be loaded asyncronously, but await and .then are not available inside the AudioWorkletGlobalScope (rembember, this is an entirely different execution environment, only providing access to sound-related types and functionality). This means that the binary must be loaded in the main thread, then passed into the processor using the worklet’s messagePort.
Another problem comes up when instantiating the binary inside the worklet, as it fails to find the TextDecoder and TextEncoder objects, required for transporting strings between JS and WASM. Turns out these types are not available inside AudioWorkletGlobalScope, but are absolutely crucial, as my sequencer implementation defines channel patterns using strings. It is also very important for logging, as console.log cannot work inside Rust when TextDecoder is not present. The problem can be fixed by providing a standalone implementation of these objects and importing those in the beginning of the binding file generated by wasm-pack. For this, I modified my build script to prepend the appropriate import in the beginning.
Implementation
After getting familiarized with the technologies, it is time to take a look at the implemented features and their inner workings.
Sound Synthesis
Firstly, the backend part of the syntesizer is presented: how it generates and uses sound in the keyboard and sequencer. After that, the UI and communication between it and the synth is detailed.
Oscillators
The basis of electronic music creation are oscillators; they are components which can create sound waves of different types, mainly using periodic functions. The current version of the synth supports 4 different types, from left to right: -sine: the trusty sine function -square: implemented by taking the sign of the sine function -triangle: implemented with sine and asin -noise: using random number generation
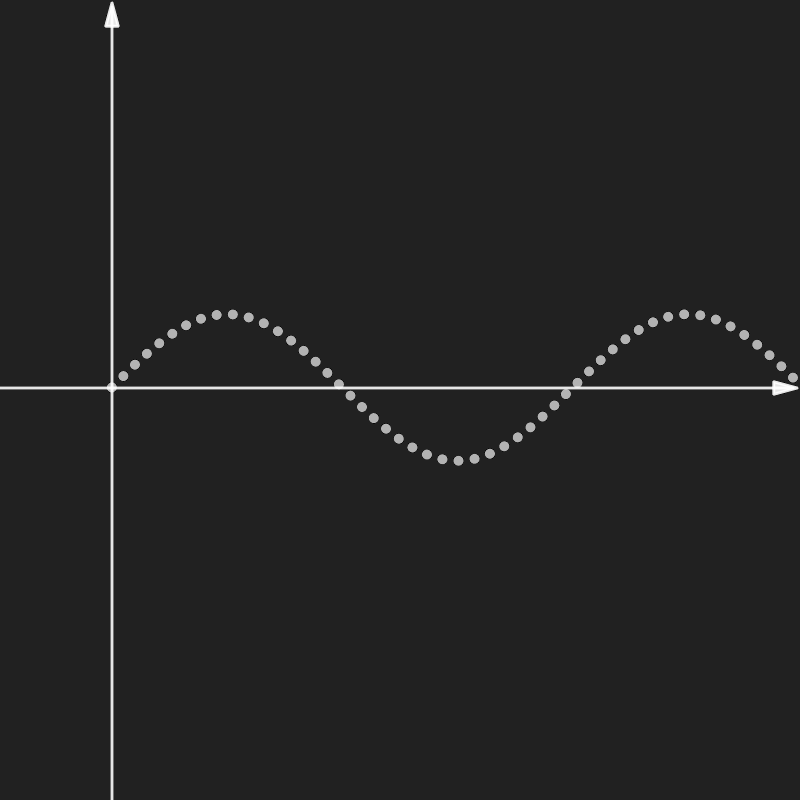


Each oscillator returns 128 samples upon request, as the synthesis happens digitally. For this, the mathematical functions are sampled at 48 kHz, which is the standard sample rate defined by the AudioWorkletProcessor API.
Oscillators require 4 parameters to function:
t: the current time (of the first sample)freq_hz: oscillator frequency in Hzlfo_amplitude: the amplitude of the LFO (see below)lfo_freq_hz: the frequency of the LFO in Hz (see below)
LFO
The LFO (low-frequency oscillation) is an oscillator feature that provides a vibrato-like effect to the output signal. It works by slightly altering the frequency of the carrier - the magnitude and frequency of it is controlled by the last two parameters.
Note on RNG
The noise oscillator works by filling in the sample block with bounded random numbers. However, Rust cannot generate random numbers when compiled into WASM, and calling Math.random() from JS would hinder performance, so I decided to implement a small Lehmer32 random number generator, which is simple, fast and provides enough randomness for a pleasant sound experience.
Envelopes
Oscillators create those “8-bit” sounds we all know and love, but for creating more realistic instruments, futher elements are required.
For starters, instruments in real life take time to produce sound at their highest volume. Consider a big church organ: when the musician plays a note, the tubes gradually fill up with air, making the sound “develop” before reaching a constant volume. When the musician releases the key, the note will linger then fade out slowly, opposed to an instant shutoff. In software, this behaviour is modeled using envelopes.
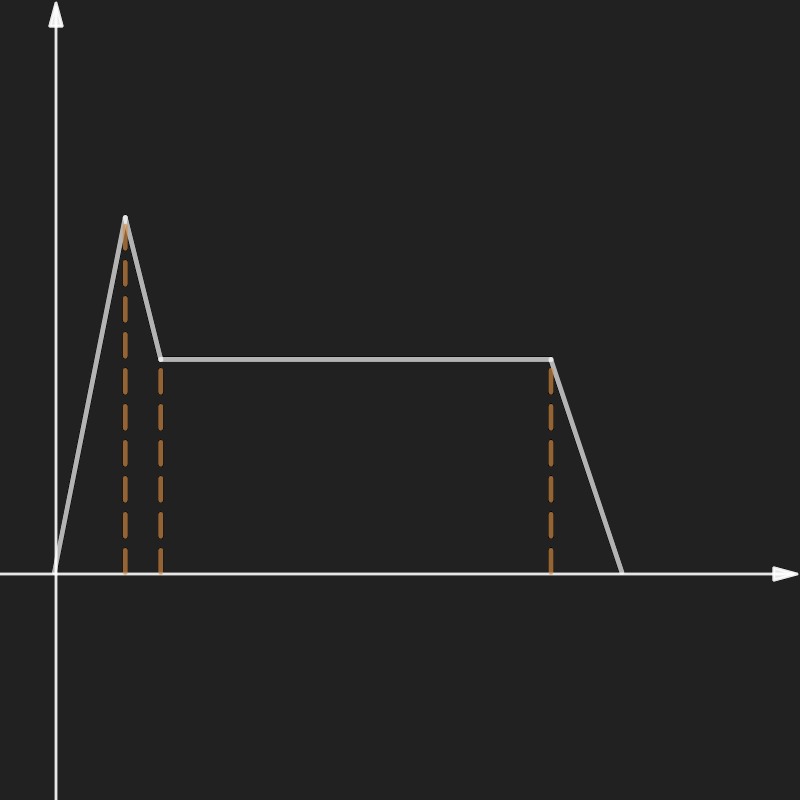
An envelope is a function that determines the volume of a sound wave at a given time. There are different versions available, but the project only support a single, but more complex one - the ADSR envelope.
As its name suggests, an ADSR envelope consists of 4 distinct phases. These are:
attack: the “spool-up” part of the sound, where it constantly gains volumedelay: a small decrease in volume after the initial peak (mostly noticeable in plucked instruments)sustain: the normalized state of the noterelease: a gradual volume decrease at the end of the note’s life
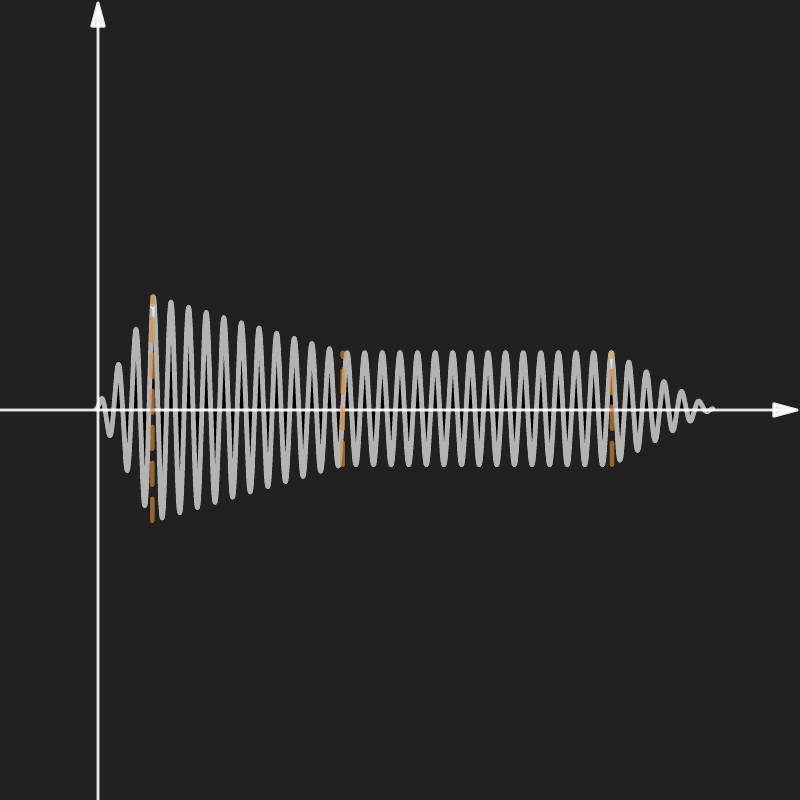
Combining a sound wave with an envelope is as easy as multiplying each sample with its corresponding envelope sample.
Fixed ADSR Envelope
For the sequencer, a slightly modified version of the ADSR envelope is required, which bounds the length of the note to its lifetime, meaning that it automatically enters the sustain phase after a certain time. This is because percussive instruments do not have a distinct on and off phase - they only provide a short burst of sound.
Instruments
Using oscillators and envelopes, creating realistic-sounding instruments is easy and provides surprisingly good results. Instruments are comprised of one parameterized envelope and an arbitrary number of oscillators with specific parameters (type, frequency offset, LFO). With the program, it is possible to use predefined or custom-built instruments - however, this feature only exists on the Rust side as of yet, but predefined instruments are perfectly accessible to users.
Instruments jump up an abstraction level and use actual notes instead of operating with raw frequencies. For this, each note in the chromatic scale gets a numeric ID, starting from 0, which represents the lowest note on a standard piano keyboard. With a small utility function, this ID can be converted to a frequency:
pub fn piano_scale(note_id: u32) -> f64 {
  440.0 * 1.0594630943592952645618252949463_f64.powi(note_id as i32 - 49)
}
Storing note IDs and other information is achieved via the Note struct, which stores when the note began and ended in addition to the already mentioned ID. These timestamps are important because this is what the envelope uses to figure out the note’s current state and deliver the correct amplitude. For the sequencer, the note stores which channel it resides on, to select the appropriate instrument for playing it.
Features
After getting familiar with the building blocks, it is time to check out the more complex features of the application.
Keyboard

The first implemented feature is an interactive polyphonic piano keyboard, which the user can interact with using the physicial keyboard (with the layout shown on the piano keys) or by clicking/tapping on the virtual keys. The two arrows allow switching between various octaves for accessing the whole piano note range in segments.
On the Rust side, the keyboard holds a boolean array that represents which keys are pressed at a given time. Additionally, it also stores which notes are currently playing. When a new sample block is required, the keyboard first updates its notes array by comparing it to the pressed keys, which can result in these outcomes:
- no note, but key is pressed: this means the key has just been pressed, so add a new note to the notes array
- note found and key is pressed: no action necessary
- note found, key pressed and note is in release phase: “reactivate” the note by resetting its envelope
- note found but key is not pressed: the key has just been released, so activate release phase on the envelope
These operations are implemented as modifying the on and off timestamps of the corresponding Note instance, not directly manipulating the envelope itself, to allow extensibility.
After updating the notes array, the keyboard requests samples from the organ instrument with the specified notes array to sum them up, creating the desired polyphonic effect.
Sequencer
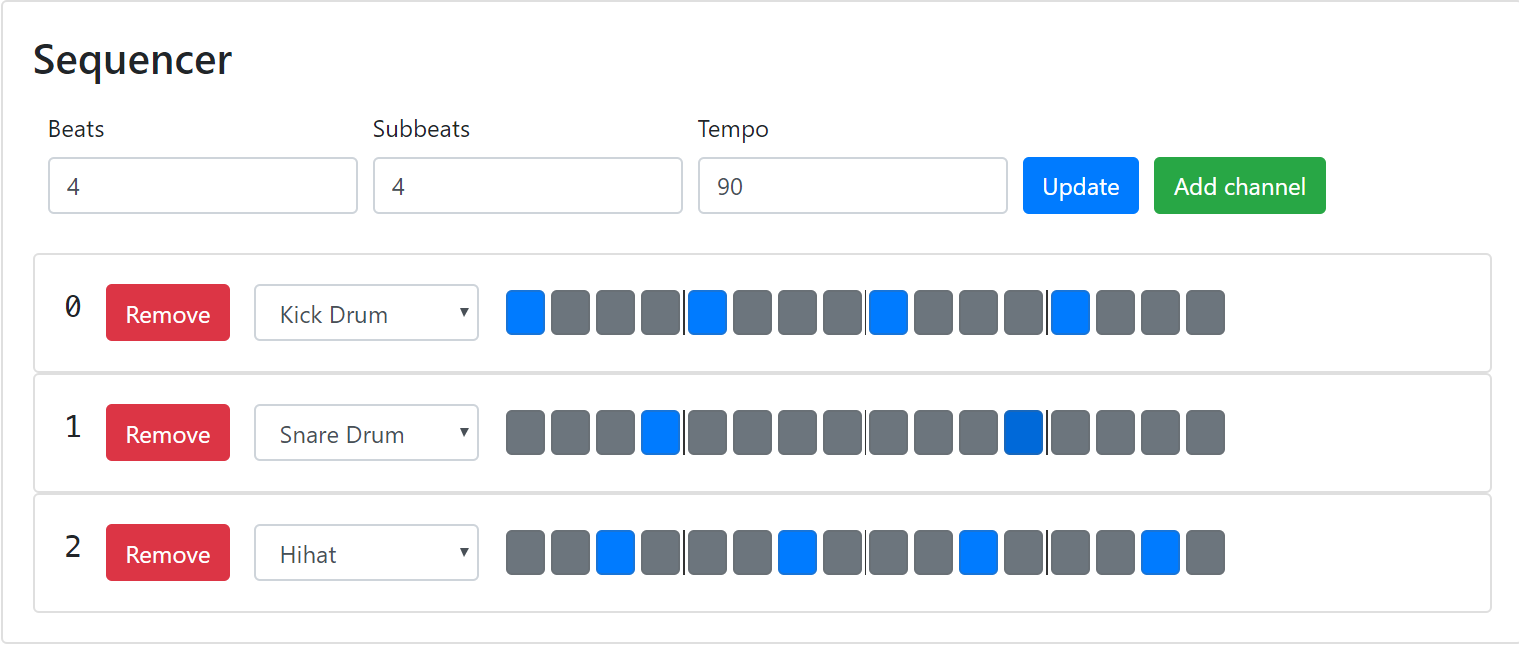
The other, more complex feature is a drum sequencer with unlimited channels, 3 instruments and configurable beat, subbeat size (also called a time signature) and tempo. The frontend supplies updates to it via numbers (for beat and tempo-related info) or strings (for representing a channel pattern, like this: x...x...x...x...).
Internally, the sequencer holds channels, which represent an instrument and a pattern. A pattern is just an array of BeatNote enum instances, which store whether there is a note or not in the current subbeat. If there is, it also stores the id of the note, though for now this is a constant value, as drums can only produce one frequency.
Sequencers need to be very punctual, as their sole job is to provide notes at their exact time, without delay. For this, an inner helper variable is computed after each timing update to store the length of a subbeat. Another timer variable is incremented after each sample generation. If it exceeds the subbeat length, that means that we reached a new subbeat, so new notes must be started. Resetting the counter is achieved by subtracting one subbeat’s length from it rather than setting it to 0 - this is because the timer might not be exactly on one subbeat’s length, and setting it to 0 would make it out of sync. This intent is much clearer when expressed in code:
self.elapsed_time += DELTA_TIME;
if self.elapsed_time >= self.beat_time {
  self.elapsed_time -= self.beat_time;
  // start new notes ...
}
Starting new notes is achieved by iterating over each channel and checking whether there is a note present at the current subbeat - if there is, create a new note and add it to a similar notes array seen in case of the keyboard. Note processing is virtually the same as well: each note is sounded with its appropriate instrument, then their samples are summed together to achieve polyphony.
Master Volume
Before sending out the keyboard and sequencer output to JS, they are combined together in the main struct of the program called SynthBox, which represents the whole soundsystem as a whole. After combination, a scaling factor called master volume is applied to allow the user to control output volume as desired. For seamlessness, the master is a 128-long array, which can contain sample-specific volume when the volume is being changed. For constant volume, this array contains the same elements. The user can interact with the master volume using an HTML slider.
Connecting to the UI
Implementing these functions were mostly painless apart from me learning Rust alongside development, as this knowledge is not really new by any means. The more interesting part was to connect everything so the user can seamlessly interact with the components. Achieving this required significantly more time and effort than I first estimated.
Architecture
It is time we become familiar with the whole architecture of the application, as understanding it is key when talking about the means and ways of communicating between layers. The project consists of 3 distinct layers, each running in their own execution environment: the main UI thread, the AudioWorkletProcessor running in a dedicated audio processing thread, and the WASM binary running in the WASM interpreter/processor.
UI Thread
The UI thread manages the HTML, CSS and user-specific event handling. It is also responsible for setting up the AudioContext and connecting up the worklet, then loading and sending the WASM binary to the background thread, finally declaring event handlers to enable interactivity in the application. These event handlers send information to the worklet in different ways - these are detailed in the next section.
AudioWorkletProcessor
The AudioWorkletProcessor, in this case called WasmWorkletProcessor is responsible for capturing user events coming from the main thread and forwarding them to the WASM code contained inside it. Its process(input, output, parameters) method gets called by the sound hardware whenever a new sample package is required, where the appropriate WASM function is called that creates the new sample block, which is then passed to the sound card as output.
Communicating with this component can be achieved in 2 ways:
worklet.port.postMessage({...}): the UI thread can post arbitrary JS objects through the messagePort, which the processor can catch by supplying anonmessagefunction to its own port. In the app, every message must contain atypeattribute to distinguish between different message types. This method works best when data that changes rarely is supplied. Almost all communication is achieved using the messagePort, apart from sending the master volumeAudioParam: the processor can define a special method where parameter types can be declared that can be set for this particular component. These parameters are then available in theparametersparameter of theprocess()method. On the main thread, a reference can be acquired for the parameter using theworklet.parameters.get(paramName)method, on which different operations are available to update its value. Parameters are handy when a parameter changes frequently, even between individual samples, meaning that it can vary between a scalar and a 128-long array. This is how master volume handling is implemented
WASM
The Webassembly binary runs in its own execution environment, with completely separate memory from the other parts of the application, which makes interaction a bit more complicated. Fortunately, the compiler also generates .js bindings for exported types and functions, with which calling/accessing them is no different from plain JavaScript objects and functions. Parameters and return types are also handled appropriately.
However, returning arrays this way is not optimal because the output is copied from WASM to JS, which is a slow operation. Instead, a smarter solution is to create a Rust function that returns the memory address of the array we want to read, then access that data from JS through WASM’s exposed memory object. This way, large amounts of data is not copied, making the program run faster. In code, it looks something like this:
pub fn get_ptr(&self) -> *const f64 {
  self.out_samples.as_ptr()
}this.samplesPtr = this.synthbox.get_ptr();
this.samples = new Float64Array(this.memory.buffer, this.samplesPtr, 128);This way, after generating the sample block, it can be simply read out and copied into the output parameter - this saves us one full copy, which can be significant. As the WASM memory is just a plain byte array, boxing with JavaScript’s typed arrays is required to read correct data.
The presented technique also works for providing input array parameters. Before calling the function using it, the JS code can write the new parameter array directly into the memory where it resides. This is how it works when setting the master parameter:
this.masterPtr = this.synthbox.get_master_vol_array_ptr();
this.master = new Float64Array(this.memory.buffer, this.masterPtr, 128);
// ...
if (parameters["master"].length > 1) {
  this.master.set(parameters["master"]);
} else {
  // for a constant volume, create a constant array
  this.master.fill(parameters["master"][0], 0, 128);
}
// call WASM function using master
Communication
Now that we are familiar with the architecture and communication options, it is time to connect the dots and understand the communication model. In this section, 3 examples are provided that will cover how data flows through the system.
Setting the Keyboard Keys
Pressed keyboard keys are updated on the UI thread based on whether a key is pressed on the keyboard or virtual keyboard. On each state change, the new configuration is passed to the worklet via its messagePort, where it stores the new state in its own array. Inside the process() method, the new keys are copied into the area of memory where a Rust allocated array keeps track of key states before generating the new sample block. Before returning from the function, the output is copied from the WASM memory to the output parameter, as described before.
Setting the Master Volume
As mentioned before, the master volume is updated using the AudioParam feature of worklets. The routine for this happens every time the volume slider changes, calling master.setValueAtTime(volume, context.currentTime), which provides a fast but smooth transition to the new volume value. In the worklet’s process() method, the new volume data is passed into WASM memory, where it will be used to scale each output sample before returning.
Updating the Sequencer
The simplest one of the 3, updating the sequencer is achieved by sending different types of messages through the messagePort with appropriate parameters. In the event handler, these messages are forwarded to a WASM function call which updates the sequencer’s internal state. For sending a new sample, it looks like this:
// UI Thread
worklet.port.postMessage({
  type: "update_pattern",
  index: channelIndex,
  pattern: channelPattern,
});

// Worklet
// ...
case "update_pattern":
  this.synthbox.update_channel_pattern(e.data.index, e.data.pattern);
  break;
Of course, the UI thread also updates itself and the DOM to reflect any changes made, but this is pretty standard so no explanation is needed. Also, every update apart from changing tempo or time signature is instantly applied (even channel addition/removal), which is very convenient. The latter cases require a full reset because it would break internal data structures (timing variables and length of samples), so it is better to have a clean slate for that.
Future Plans
The project in its current state is fully functional, but provides few actual features. However, it also demonstrates how these new technologies can be used together, which is in itself an accomplishment. In the future, many more features can be added that would make this application a full-featured electronic music creation and performance tool. These include: effects that can be applied to components, creating a network through which sound can flow; providing a more intuitive, mobile-friendly UI to enable usage on-the-go (for example on an iPad). Finally, recording and playback functions could be created that provide an even better composing and mixing experience.